Configuring Shoko Metadata
If you chose Shoko Relay as your Agent/Scanner combo you can skip this page and move directly to the Configuring Shoko Relay page.
Creating A Shoko Metadata Library
Add a Plex Library
- While Shoko Server is running, open Plex and create a new TV Shows or Movies library.
- Ensure that you have completed the required edits mentioned on the Installing Agents & Scanners page.
Add a Folder to Your Library
- When prompted to add folders to your library, browse to your anime collection.
- Even though Shoko will provide the metadata, Plex still needs to know where the physical files are located.
Configure the Advanced Settings
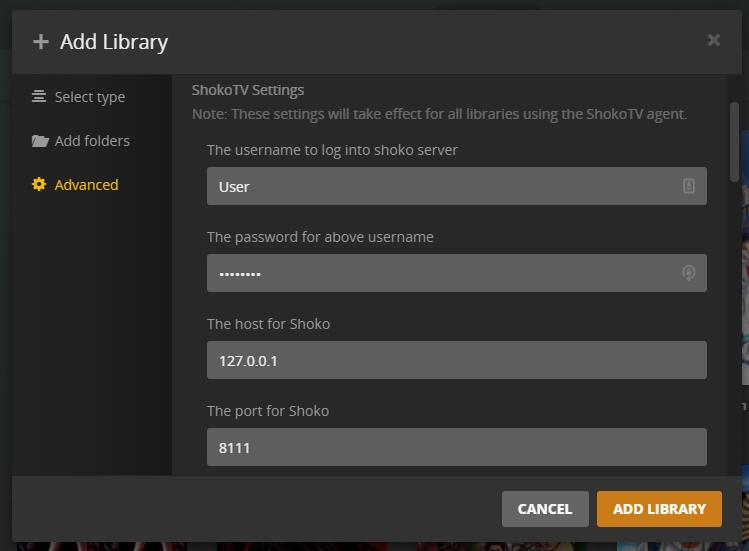
- In the Advanced tab, if you're adding a TV library, select: Scanner Shoko Series Scanner and Agent **ShokoTV **.
- If you are adding a movie library instead, choose: Scanner Shoko Movie Scanner and Agent ShokoMovies.
- Enter your Shoko Server credentials which are the only required settings.

For more information on each of the required settings consult the table below:
Option Description Username
The username for the local account you created during the First Run setup in Shoko Server.
Password
The password for the local account you created during the First Run setup in Shoko Server.
Server IP
The IP address for the computer where Shoko Server is located. This can be left blank unless Shoko Server is running on a different computer.
Port
The port Shoko Server uses, by default it iss 8111
Use Single Season Ordering
If you set SingleSeasonOrdering to True during the install process, make sure you check this box.
Add the Library
- Once you haveve reviewed and configured the remaining options, click the Add Library button.
- After adding the library, initiate a scan within Plex and wait for Plex to add your collection.
